Moelleux Chocolat Framboise モワルー ショコラ フランボワーズ

This is a guest post at Veronica’s blog “Quay Po Cooks” whom I got to know through the numerous Aspiring Bakers bakealongs. From a fellow blogger to a friend, this lady beams with so much postive aura and sunshine, it is infectious! I love reading her blog, where every recipe entails a story, heartwarming tales of her family and friends which often reminded us of our very own. Through the lines, she shares with us her moments of euphoria and sorrow, causing one to can’t help but let out a giggle or shed a tear as we read along. Her words are often simple, yet enriched with much sincerity. In short, this woman writes from her heart. When Veronica invited me to do a guest post on her blog, I knew I couldn’t say no. In fact, it would be such an honour, as a repayment in kind, for the very many wonderful reads. Thank you for letting us in your life. 🙂
I asked Veronica if she had any preference for the recipe and she indicated that she’d hoping for something sweet, since pastry is my forte. I am flattered but surely sweetness cannot be the only dimension presented, especially for a woman who has led such a colorful life, After much deliberation, I’d decided to share with all of you a recipe which I feel aptly encapsulates the essence of all that Veronica’s been through. Oh yes, if you have gone through her blog like I did, you would know that this woman has gone through quite a bit over the years. Read on and you would know why…

Moelleux Chocolat Framboise is a petit four sec, in summary a dainty french baked tea cake most noted for its soft and fluffy textures. It is a classic french confection and the recipe I’m using is by the renowned Japanese patissier 川村英樹 Hideki Kawamura who gained international recognition and acclaim after winning the prestigious World Pastry Cup in France more than 20 years back. He is mostly known for his chocolate work, and thus a chocolate piece would have been most appropriate to sample his creations.

The original recipe is made up of 2 components, a chocolate tea cake base, which would be filled with a pate de fruits framboise(raspberry jelly candy), and finally decorated with more pate de fruits framboise . I’d adapted his recipe slightly, retaining the cake base recipe, but replacing the pate de fruits with a homemade confiture de framboise (raspberry conserve) instead. Also fresh raspberries are used to embellish the final product. The modifications were made for a couple of reasons. Firstly, the original recipe has only two components with the pate de fruits framboise being used in two areas of the cake, which I found to be a bit “boring”. I’d decided to “complicate” things a bit in hope to make it more interesting, through the use of fresh raspberries for decoration instead. Moreover, fresh fruit adds so much dimension to the cake in terms of flavour and aromatics, and raspberries being one of my favorites. Secondly, the mould for making pate de fruits framboise is not an everyday pastry commodity. So in attempt to make things “harder” with more components, the overall procedure has ironically become logistically simpler!

Moelleux Chocolat Framboise モワルー ショコラ フランボワーズ (adapted from 川村英樹 Hideki Kawamura’s Art de Bon Chocolat おいしいショコラは美しい)
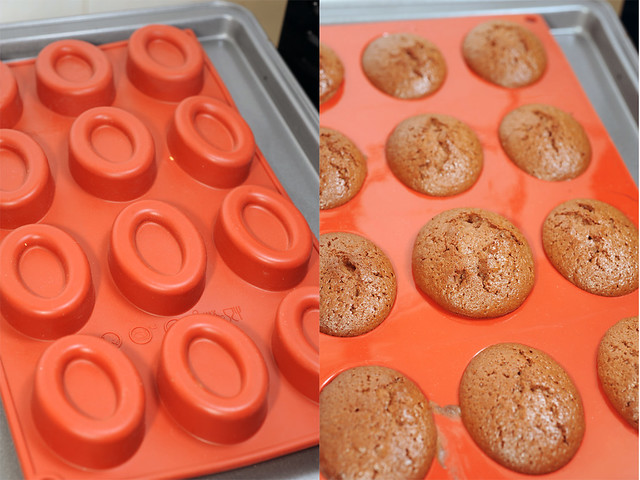
for 18 individual tea cakes on a single oval with cavity silicon mould tray
Ingredients
Moelleux chocolat cake
190g marzipan (can use storebought or for the more adventurous, make your own!)
225g whole eggs (about 5 medium eggs or 4 large eggs)
30g bread flour
5.5g baking powder
110g 62% cacao chocolate couverture (I used Valrhona Caraibe)
55g unsalted butter
Confiture de framboise
165g fresh raspberries
210g caster sugar
juice of half a lemon (seeds also if possible)
Garniture
Fresh raspberries
Mint leaves

Method
To prepare moelleux chocolat cake
Place marzipan in a large mixing bowl
Beat eggs and slowly mix into the marzipan over a few additions until well amalgamated. It helps to use your hands to “knead” in the egg mixture initially. When the marzipan has homogenize into the egg mixture, switch to a hand whisk and continue mixing.
Heat the mixture over a bain marie until 50 C
When the temperature has reached 50C, whisk the mixture with handheld or stand mixer until pale and fluffy. It should have the consistency of thickened cream. This process requires patience as it could easily take up 5-8 min to acheive the desired consistency.
Fold in sifted bread flour and baking powder over 3-4 additions. Set aside.
Melt chopped couverture chocolate and butter over a bain marie and add a small quantity of the batter mixture into chocolate mixture to emulsify and lighten the chocolate mixture.
Pour emulsified chocolate mixture back over batter and fold in until well incorporated.
Pipe into silicon mould until 80% full and bake at a preheated oven at 160C for 20 min.
Leave to cool complete before unmoulding.
To prepare framboise confiture
Place raspberries in a metallic mixing bowl and add all the sugar. Mix well, ensuring that every raspberry is well coated with sugar granules. Leave aside for the berries to macerate. Stir the mixture every 5 minutes or so. The finished product should have developed a pulp-like, mushy consistency
Heat raspberry pulp over a bain marie or in a microwave until 65C, stirring constantly
After a while, the consistency thickens to be like heated jam.
Add lemon juice and mix well to incorporate. If lemon pips are available, add in as well. Perform the ” plate streak test” to check if the jam has begun to set. The viscosity of the confiture very much depends on the natural pectin released by the raspberry pips as well as seeds from the lemon. If the confiture is too runny or fails to set well, mix 10g of caster with 3-4g of pectin powder and stir in quickly.
Once the confiture is ready, i.e. of the right consistency, press the cooked jam through a sieve to filter away most of the raspberry pips, as well as lemon seeds.
To assemble, pipe, or simply dollop a teaspoon of the raspberry confiture over the cavity of the baked moelleux tea cakes.
Leave for conifture to cool and set.
Garnish with fresh raspberries and mint leaves.

I love this recipe because of the complexity of flavours which are packed in these bitesize morsels. Sweetness from the jam constrasts with the sharp and tart flavours of the fresh raspberries, as well as the slight bitterness from the dark chocolate. Chocolate noir used adds depth to the richness of the teacake while the aromatics are played through the fresh raspberries which also provided a refreshing touch. So use the freshest raspberries you can find! In retrospect, the flavour profile is basically an uncanny reflection of our lives isn’t it? So even more so for Veronica’s!

The teacake is to be eaten in two bites, and hence the two raspberries used to top. So each bite would include a bit of cake, a bit of jam and finally a raspberry, allowing all the flavours to intermingle and layered out for a truly multi-faceted experience!
You doesn’t have to go out and buy a silicon mould with cavities just to make this recipe. A brownie tin would do just fine. Simply cut into fingerfood size pieces and dollop the raspberry jam on top of it followed by the fresh raspberries. But the mould would be useful for a range of small bakes, and the cavity can be filled with a range of stuff, from ganache, to creamcheese, sabayon mousse etc.
The recipe for confiture du framboise makes more than enough jam for the teacakes. Unlike the traditional jam-making methods, no water was added at all. The berries were basically macerated in their own juices which were drawn out by the sugar. Richer flavours guaranteed! The rest of the raspberry confiture can be bottled and refrigerated, to be enjoyed with scones and Devonshire clotted cream!
Hope you guys enjoy the recipe!


very beautiful photos and useful information. wonderful stuff!
June 7, 2012 at 10:31 am
thanks!
June 15, 2012 at 9:56 am
Alan, sending you a Big Bear Hug all the way from sunny California. Thanks a million for doing this guest post for me while I went wine tasting at two wineries. I tasted twelve different kinds. I am a little high now. LOL!
June 7, 2012 at 11:28 am
the pleasure is mine!!!
June 15, 2012 at 9:56 am
Such a beautiful dessert Alan and so are the pictures. Going to hop over to QPC for the recipe.
June 7, 2012 at 10:12 pm
yeah! Thanks Getrude!
June 15, 2012 at 9:54 am
Great guest post for Quay Po ! Look absolutely tempting and delicious .. I need to continue to read your Japan post as I am going there next week, feel so excited now…^_^
June 7, 2012 at 10:44 pm
Thanks Sonia! hope you have a great trip in Japan!!!
June 15, 2012 at 9:54 am
Hello, Alan. I popped over from QPC. Just had to tell you that this was an amazing and wonderful guest post. Gonna poke around your blog for a bit … don’t mind me 🙂
I’m already liking what I’ve seen!
June 9, 2012 at 11:02 am
Thanks Ping for dropping by!! 🙂
June 15, 2012 at 9:53 am
i love your photos…so crisp….i woukd like to know what kind of camera do you use? thank you!
June 26, 2012 at 6:07 am
Hi Lulu, i’m using a Nikon D700. Thanks for dropping by and leaving such a lovely comment!
June 26, 2012 at 10:25 pm
way to go Alan…its very simple and great recipe too…love it….hope to hear further recipes from you Alan…=)
June 28, 2012 at 10:08 pm
Thanks Farra! It’s a very simple recipe indeed. Just be careful so as not to overmix the batter and the cakes would turn out incredibly soft and moist!
June 28, 2012 at 11:02 pm
so pretty!!!
April 3, 2013 at 4:00 am
Thanks for visiting! 🙂
April 4, 2013 at 11:12 pm
wow this is stunning and looks devine. Was it time consuming to make?
May 29, 2013 at 1:21 am